


Make your app stand out using Meta Tags - better SEO and shareability
Another fantastic new feature in APEX 22.2 - Meta Tags, will allow not only то havе nice previews of our public web pages, but also а better SEO.


What are Meta Tags
Meta tags are text fragments that describe a page's content. They only appear in the source code of a page, not on the actual page. They are typically found at the "head" of the page. The "meta" in these tags stands for "metadata," which is information about the information on your page. Meta tags are simply tiny content descriptors that assist in describing to search engines the subject matter of a web page. They are also used by other websites when they need to generate a preview of your page, including title, description, image and so on.
Meta Tags and APEX
You can now define meta tags for your public-facing APEX pages directly from Page Designer. This is especially useful when combining with the new Share dynamic action to display page previews on social media.
Let's start by saying that having Meta Tags in your APEX application was still possible in previous versions. But they had to be added manually either in some of the Page Templates or in the Header of each individual page. Now in 22.2 it is all declarative and a lot more convenient. Let's go through the changes that APEX introduced in 22.2 in regards to Meta Tags.
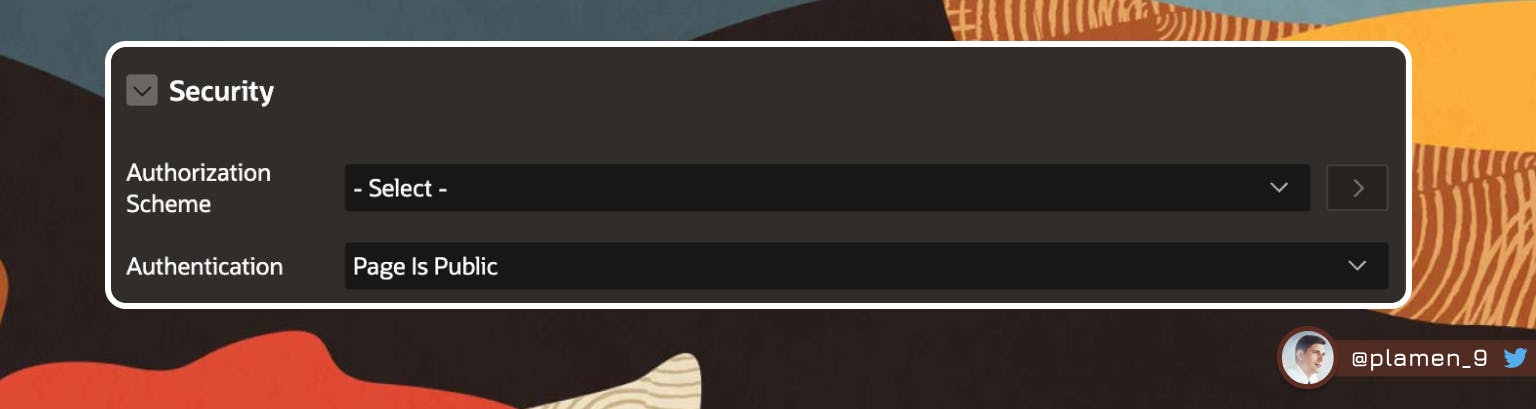
- To enable them you need to have a public APEX page. This is controlled through the
Authentication settingsunderSecurityin your Page properties.
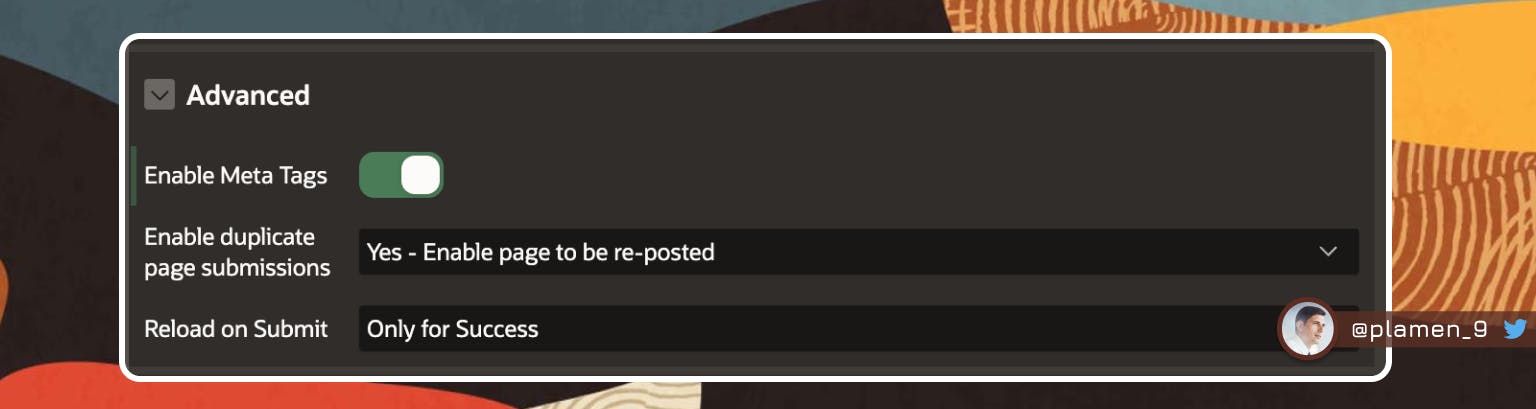
- We are not ready to use Meta Tags yet. They should be enabled first. It is again a Page setting. And it is disabled by default. Enable it, so you can start adding Meta Tags.
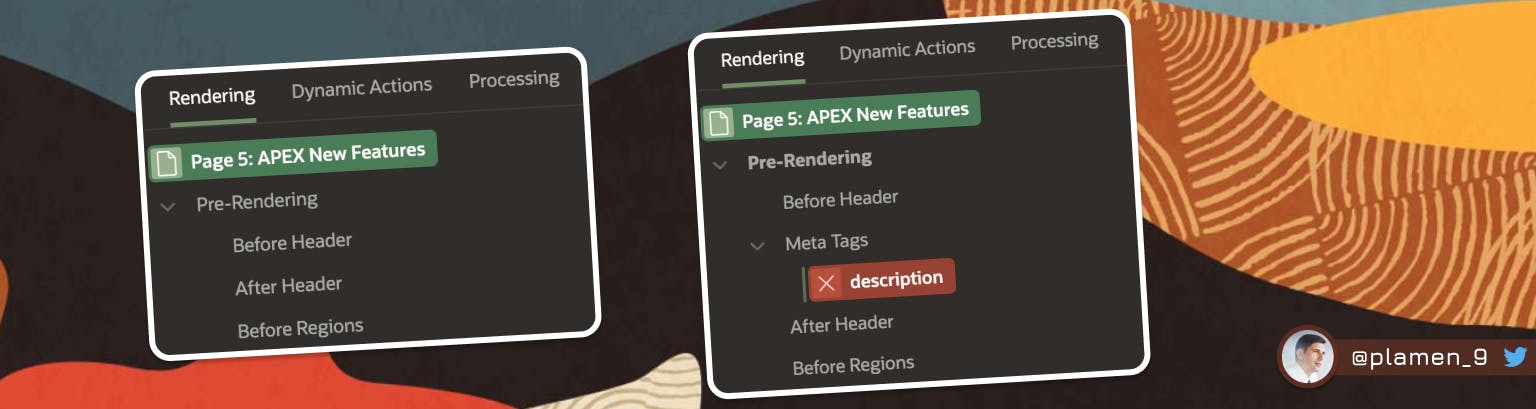
- After enabling the Meta Tags, a new menu appears in the Pre-Rendering area on your Page in the Builder. It has the first and probably most important Meta Tags of all - description. You now have to go and add a proper description of your page.
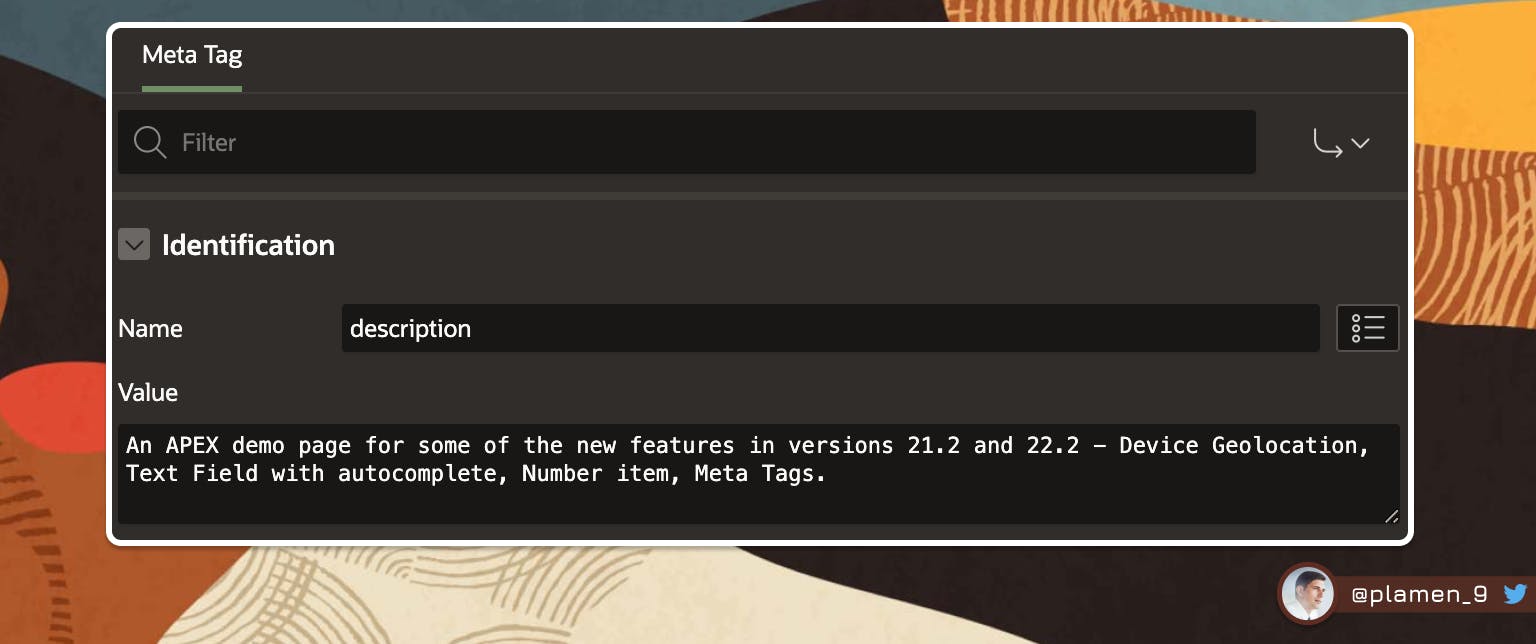
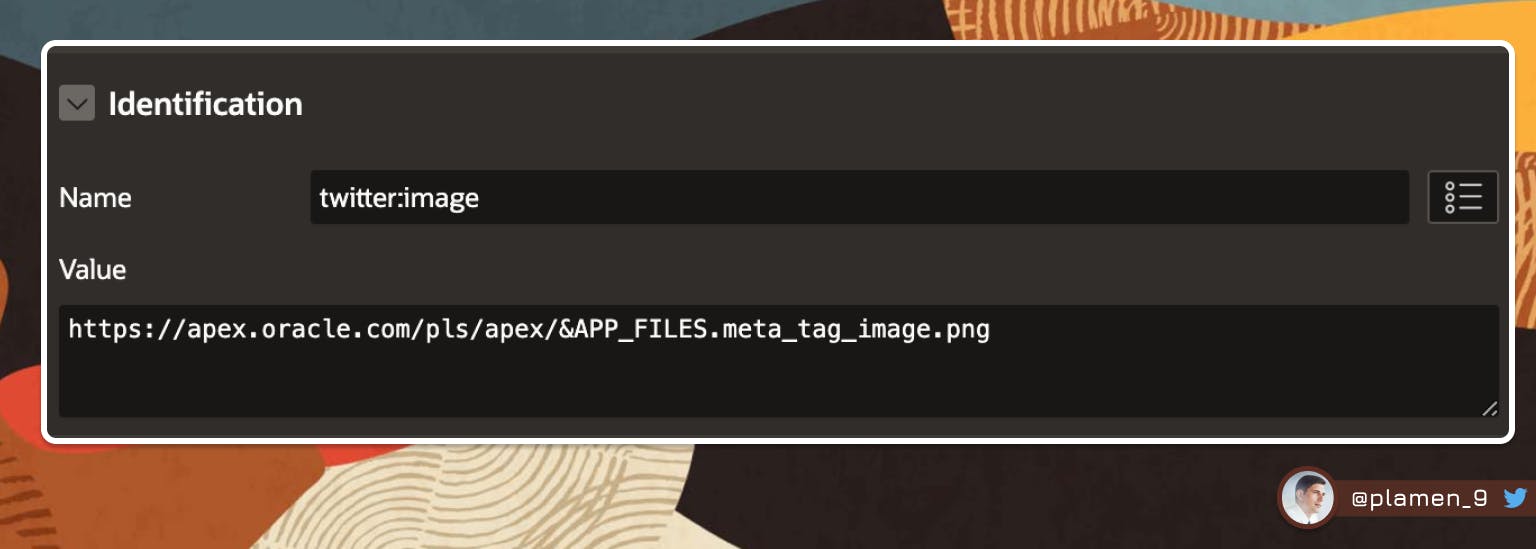
- Here is an example of the
descriptionandtwitter:imageMeta Tags in one of my demo pages. Note that you can use Application Static Files or Workspace ones.
To learn more about the Twitter and Open Graph specific Meta Tags, visit the following links:
🔗 Open Graph Meta Tags, used by Facebook
🔗 Twitter cards - getting started
🔗 Twitter cards - Meta Tags described
Here is how my HTML meta tags look like after being created from the APEX builder:
<!-- Most important Meta Tags - the title and description -->
<meta name="title" content="Overview of the APEX new features ">
<meta name="description" content="An APEX demo page for some of the new features in versions 21.2 and 22.2 - Device Geolocation, Text Field with autocomplete, Number item, Meta Tags.">

<!-- Facebook and Twitter specific Meta Tags -->
<meta property="og:type" content="website">
<meta property="og:title" content="Overview of the APEX new features ">
<meta property="og:description" content="An APEX demo page for some of the new features in versions 21.2 and 22.2 - Device Geolocation, Text Field with autocomplete, Number item, Meta Tags.">
<meta property="og:image" content="https://apex.oracle.com/pls/apex/r/gamma_dev/100771/files/static/v87/meta_tag_image.png">
<meta name="twitter:card" content="summary_large_image">
<meta name="twitter:title" content="Overview of the APEX new features ">
<meta name="twitter:description" content="An APEX demo page for some of the new features in versions 21.2 and 22.2 - Device Geolocation, Text Field with autocomplete, Number item, Meta Tags.">
<meta name="twitter:image" content="https://apex.oracle.com/pls/apex/r/gamma_dev/100771/files/static/v87/meta_tag_image.png">
It's always good to go through the documentation to check for some limitations. The
twitter:descriptionfor example can be up to 200 characters. And it can be used with thetwitter:cardtag, having a value ofsummary_large_image.
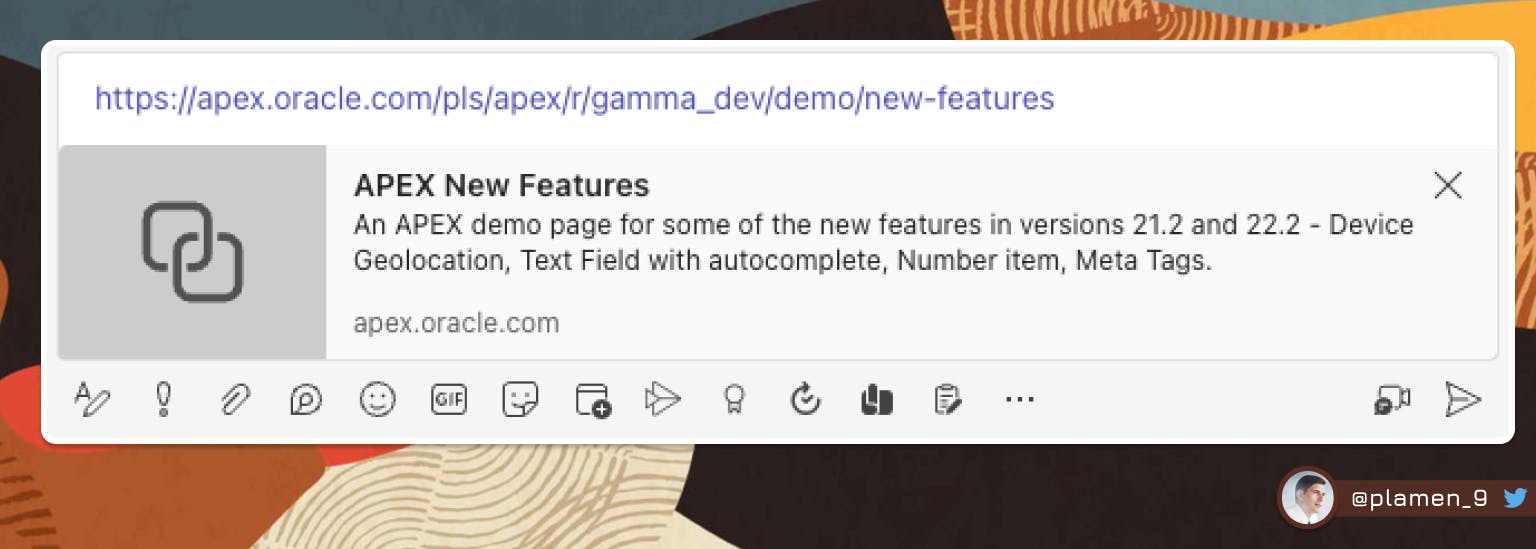
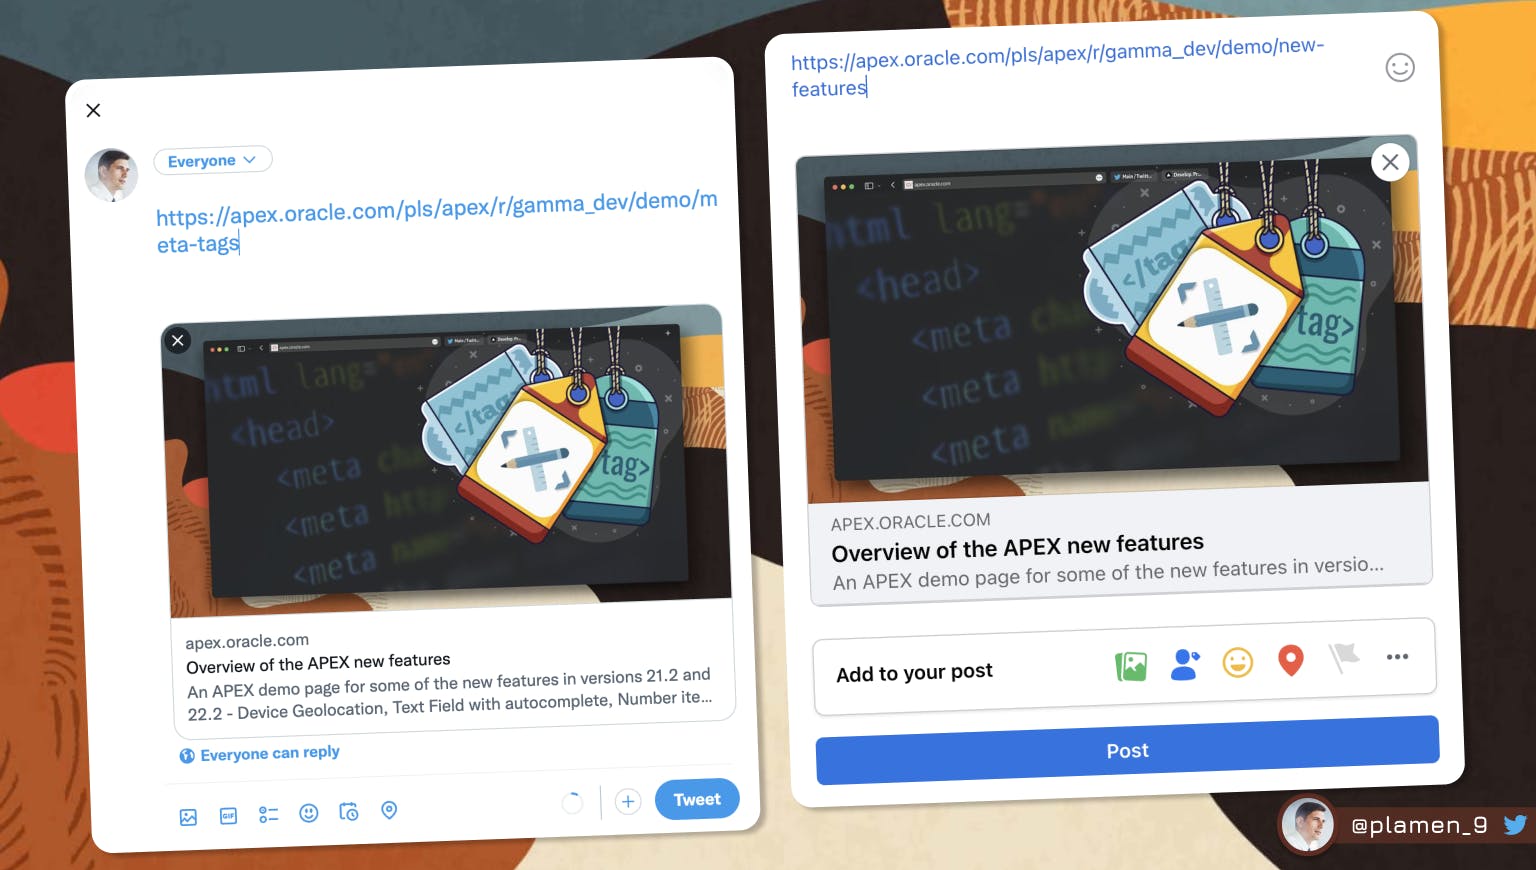
After all of the above Meta Tags are applied to our page, let's look at the result:
A screenshot of the page, being shared in Microsoft Teams
A screenshot of the page, being shared on Twitter and Facebook
Some observations that I have, using the Meta Tags to share page across social networks:
- ⚠️ If you had an existing Public Page and you now added the Meta Tags to it, Twitter might not generate a nice card for it right away. I guess this is due to the fact that the page might have already been indexed and cached with the old version, having no Meta Tags. Creating a brand new page, with Meta Tags and making it public on the other hand always worked for me. So don't get discouraged if you don't see a nice Card in Twitter when sharing your page. Facebook doesn't seem to have that issue or at least it always worked for me - no matter when the page was created or if it had Meta Tags or not before.
- ⚠️ If you still don't see a nice card generated, play around with the following parameters of the
Application Definition/Security:
- Under
Authorization, disable theRun on Public Pagesoption- Under
Session Management, setRejoin Sessionsto Enabled for Public Sessions andDeep Linkingto Enabled
The Twitter Card is not displaying? - As rightly suggested it has to do with web crawlers having not yet indexed/reindexed your page. Here is what Twitter says about the frequency of that check:
"❔My Tweet shows an outdated version of my Card.
💡 Once your domain is known to the validator, the web crawler re-indexes the meta information on your tag roughly every seven days."
🔗 Full Twitter Card Troubleshooting guide could be found HERE.
Meta Tags and Google ranking - SEO
SEO for public websites has long benefited from the use of meta tags. In other words, how Google and other search engines rank your web pages is dependant on them. In a nutshell, search engines have specialised bots that browse the web and scan websites. Meta tags are one of the things they are looking for. Additionally, the more exact and superior your Meta Tags are, the higher you can be rated when someone looks for the information you have to offer.
Speaking about
SEOand especiallytitleanddescription. Many people still use thekeywordsmeta tag too. Forget about it. Google doesn't care about it. Read the following page from Google - it will clear a lot.
🔗 Google indexing and meta tags
Here are some important things to keep in mind, while adding the Meta Tags.
title, og:title, twitter:title
- Give each page a unique title that describes the page’s content concisely and accurately.
- Keep the titles up to 50-60 characters long to avoid them being truncated
- Put important keywords first, but in a natural manner, as if you write titles for your visitors in the first place.
- Make use of your brand name in the title, even if it ends up not being shown, it’ll still make a difference for the search engine.
- Remember it will also be the text, displayed in the browser's tabs
To have the best version of your titles, you can use special tools to help you with that.
🔗 Monster Insights gives a rating from 1 to 100 of your title and tells you what can be improved.
description, og:description, twitter:description
- The description occupies the largest part of a snippet and invites searchers to click on your site by promising a clear and comprehensive solution to their query.
- If your description contains the keywords a searcher used in their search query, they will appear in bold.
- Meta description should clearly reflect what information is on the page.
- Google’s snippets typically include around 150-160 characters. We already mentioned the
twitter:descriptionlimit of 200 characters.og:description, used by Facebook allows up to 300 characters. So my recommendation is to try to stay below 150 characters, but also consider having two or three versions for each of the three Meta Tags, depending on your target audience. - Optionally, use an eye-catchy phrases or additional hints on what to expect – ‘Learn’, ‘Buy’
Improve, etc.
robots
- With this attribute, you’re telling the search engines what to do with your pages. Should they have been indexed or not.
index/noindex– This tells the engines whether to show your page in search results or not.follow/nofollow– This tells the engines what to do with links on your pages: whether they should trust and “follow” your links to the next page or not.
A
robotsMeta Tag with a value ofnoindexfor example could be useful to include in your APEX page while being still in development. Once all is ready, just change it and Google will recognize that and index the page. To learn more about therobotsMeta Tag, visit Google's documentation:
Now that we have our Meta Tags in place, public APEX pages updated with good
title and description, let's move on to the next step - telling Google some more about us.
The steps to better ranking - configuring the Google Console
Having a record in the Google Search Console for your application has some very important benefits:
- It helps Google to better index your application and display it better in the search results on relevant topics
- It gives you detailed information of the way your application has been performing when people search for information relevant to your app - the number of impressions, the phrases that lead people to your application, the ranking in the searches over time, the percentage of impressions resulting in clicks (very important one, usually improved with better
descriptionandtitletags)
To start using the Google Search Console, go to the following URL and login using a Google account: 🔗 Google Search Console Login
- After logging into the Console, go to the top left corner and find the
Add Propertyoption. - Enter the name of the domain under the
URL prefixproperty type section and click onContinue. This is the URL to your APEX application. - Expand the
HTML tagand copy the values. This is a specialgoogle-site-verificationMeta Tag that we will use to prove ownership of the application/website. - Back in you APEX application, you have several options to include the
google-site-verificationMeta Tag:- In one of your Public Pages, the same way as the other Meta Tags.
- In your
Application Definition/User Interface, adding the following HTML<meta name="google-site-verification" content="YOUR-VERIFICATION-KEY" /> - Changing the default
Page TemplateinShared Componentsby adding the same HTML<meta name="google-site-verification" content="YOUR-VERIFICATION-KEY" /> - The next time you open your application, the Meta Tag will be recognized by Google and you will get an
Ownership Verifiedsuccess message.

Last step - generating a sitemap.xml file. This will later be added to the Google Search Console in Sitemaps section.
A sitemap lists a website's most important pages, thus, making sure search engines can find and crawl them. Sitemaps also help in understanding your website structure, making it easier to navigate your website.
But do we really need a sitemap? Here is what Google has to say about it:
If your site's pages are properly linked, Google can usually discover most of your site. Proper linking means that all pages that you deem important can be reached through some form of navigation, be that your site's menu or links that you placed on pages. Even so, a sitemap can improve the crawling of larger or more complex sites, or more specialized files.
🔗 To read more about Sitemaps and how Google uses them, visit their Sitemaps Overview Page.
Having said that, and in case you really do think a sitemap would be beneficial, a sitemap.xml can be manually generated and placed into your APEX Static Files.
🔗 You can also read Anton Nielsen's post in Insum's blog and implement his solution in your app. What the sitemap.xml should look like is the following:
<urlset xmlns="http://www.sitemaps.org/schemas/sitemap/0.9">
    <url>
        <loc>https://mywebsiteurl/</loc>
        <changefreq> always </changefreq>
        <priority> 1 </priority>
        <lastmod>2022-10-17T07:28:41.783Z</lastmod>
    </url>
    <url>
        <loc>https://mywebsiteurl/using-meta-tags/</loc>
        <changefreq> daily </changefreq>
        <priority> 0.8 </priority>
        <lastmod>2022-10-17T07:28:41.783Z</lastmod>
    </url>
</urlset>
Read more
🔗 Thanks to Vincent Morneau for introducing Meta Tags new feature during the APEX Office Hours and in his Blog Post earlier.
🔗 Check all the new features in APEX 22.2 on the Official Website.
🔗 To learn more about them, watch the official release videos.
Follow me
Liked that post? Follow me on Twitter and LinkedIn!
🔷 @plamen_9 on Twitter
🔷 Plamen Mushkov on LinkedIn